 Pin It
 My cousin texted me at midnight asking for a dessert idea for her graduation party the next afternoon, and these bars popped into my head immediately. There's something about a pan of chewy, studded cookies that feels celebratory without demanding fancy techniques or last-minute stress. I'd made them a few times before, tweaking the colors to match different school spirits, and every single time they disappeared within minutes. The combination of chocolate chips, colorful candies, and that glossy white chocolate drizzle somehow makes people feel like they're eating something more special than it actually is.
I remember standing in my cousin's kitchen at 2 PM the next day, sliding the pan out of the oven while her roommates were still setting up tables outside. The timing worked perfectly because the bars cooled while we decorated, and by the time guests arrived, I was drizzling that white chocolate on top like a personal touch nobody expected. Watching people bite into them and immediately reach for a second one never gets old, especially when they're genuinely shocked that something so good came together so fast.
Ingredients
- All-purpose flour: The foundation that gives these bars their structure without being dense; I've learned that measuring by weight prevents the dry, cakey texture you get from scooping straight from the bag.
- Baking soda: Just a teaspoon helps these spread slightly and develop those crispy edges while keeping the centers chewy, which is honestly the whole point.
- Salt: A half teaspoon ties everything together and makes the chocolate flavor pop in a way people notice but can't quite name.
- Unsalted butter, melted and slightly cooled: Melting the butter first means you skip the creaming step and save precious time; letting it cool for a minute prevents the eggs from scrambling when you add them.
- Light brown sugar and granulated sugar: The combination of both creates that perfect chewy-meets-slightly-crispy texture, with the brown sugar contributing moisture and depth.
- Eggs: Two large eggs bind everything and add richness without making these taste eggy.
- Pure vanilla extract: Two teaspoons might seem generous, but it rounds out the sweetness and makes these taste less like a basic cookie bar.
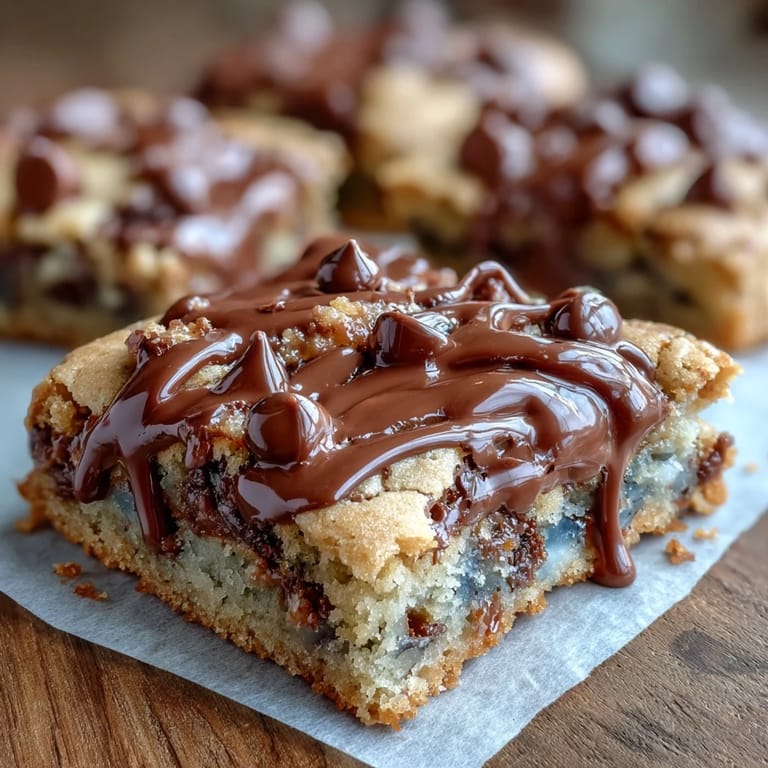
- Semi-sweet chocolate chips: These are the quiet hero; I've tried fancy brands and grocery store basics, and honestly the difference is minimal in a crowded pan like this.
- Colored candy-coated chocolates: M&Ms or whatever school color candies you find become little flavor bursts and visual celebration throughout; this is where you have fun with the theme.
- White chocolate: The drizzle finishes these off and makes them feel fancy; I prefer chopped chunks over chips because they melt more evenly.
- Vegetable oil: Just a teaspoon mixed with the white chocolate keeps it glossy and drizzle-able instead of seizing up and becoming grainy.
Tired of Takeout? 🥡
Get 10 meals you can make faster than delivery arrives. Seriously.
One email. No spam. Unsubscribe anytime.
Instructions
- Get your pan ready:
- Preheat to 350°F and line a 9x13-inch pan with parchment paper, leaving some overhang so you can lift the whole thing out later without wrestling with a hot pan. This small step saves you from burnt edges and makes cleanup almost boring.
- Mix the dry team:
- Whisk flour, baking soda, and salt in a medium bowl and set it aside so it's ready when you need it. This prevents lumps and makes the next step smoother.
- Combine wet ingredients:
- In a larger bowl, whisk melted butter with both sugars until you see no brown sugar lumps; this takes maybe a minute. Add eggs and vanilla and keep whisking until everything looks smooth and combined.
- Bring it together gently:
- Fold the dry ingredients into the wet mixture until just barely combined; this is not the time to show off your mixing skills because overmixing toughens the bars. You want to see a few streaks of flour disappear and then stop.
- Add the celebration:
- Stir in chocolate chips and colored candies, which is where these bars go from basic to special. The dough will look studded and festive, and honestly this is the most satisfying part.
- Spread and bake:
- Press the dough evenly into your prepared pan and slide it into the oven for 23 to 25 minutes. You're looking for golden edges while the center still looks slightly underbaked; it will continue cooking as it cools.
- Cool completely:
- Let these sit in the pan on a wire rack until they're completely cool, which takes about 30 minutes and is absolutely non-negotiable. Trying to drizzle warm bars is asking for a melted mess.
- Make the white chocolate drizzle:
- Chop or measure white chocolate into a microwave-safe bowl, add one teaspoon of vegetable oil, and microwave in 20-second bursts, stirring between each one. You're aiming for smooth and pourable, not separated and grainy.
- Finish with elegance:
- Drizzle the white chocolate over cooled bars using a spoon or piping bag, add sprinkles if you want that extra festive touch, and let everything set before cutting. This takes about 15 minutes at room temperature or you can speed it up in the refrigerator.
- Cut into squares:
- Lift the whole pan out using the parchment overhang and transfer to a cutting board, then slice into 16 bars. A sharp serrated knife and a damp paper towel for wiping between cuts keeps these looking clean and intentional.
 Pin It
 There was a moment at my cousin's party when an older family friend took a bite and said these reminded her of celebrating something important, which made me realize these bars are about more than just sugar and chocolate. They're permission to make something special for people you care about without spending all day in the kitchen.
The Science of Chewy Bars
The magic happens because melted butter creates a different crumb structure than creamed butter, and the combination of brown and granulated sugar balances moisture with spreading. The slightly underbaked center keeps everything tender while the edges set firm, creating that textural contrast that makes people keep reaching for more. Temperature matters here; a 350°F oven is hot enough to develop flavor without cooking everything too fast, which is why I don't recommend bumping it higher even if you're in a hurry.
Customizing for Your Celebration
The beauty of these bars is that they're essentially a canvas for whatever you want to celebrate. I've made them with red and white candies for a friend's college visit, purple and gold for another graduation, and even rainbow sprinkles for a pride month potluck. The chocolate chips and base stay the same, so the only risk is picking colors you actually like, and honestly that's the fun part of it.
Storage and Make-Ahead Magic
These bars live happily in an airtight container at room temperature for up to four days, though they rarely last that long in my experience. You can also make them a day ahead and wait to add the white chocolate drizzle the morning of your event, which means less stress when guests are about to arrive. If you need them even further ahead, bake and cool everything, then freeze in layers with parchment between for up to a month; thaw and drizzle when you're ready to serve.
- The parchment paper overhang is a small thing that prevents the entire pan from sticking and makes your life measurably better.
- A sharp serrated knife and occasional damp cloth wipes create clean cuts that look intentional instead of ragged.
- These are actually more forgiving than you'd think, so don't overthink it and just celebrate.
 Pin It
 These bars have become my go-to celebration dessert because they say yes without saying no to anything else happening in your kitchen. Make them, feed people, and watch them disappear.
Recipe Questions & Answers
- → What type of chocolate is used in the drizzle?
White chocolate is melted with a touch of vegetable oil to create a smooth drizzle that hardens nicely on the bars.
- → Can I substitute the candy-coated chocolates?
Yes, you can replace them with any colorful candies or chocolate chips that fit your preferred flavor and appearance.
- → How do I prevent the bars from sticking to the pan?
Line the baking pan with parchment paper and leave an overhang for easy removal once the bars have cooled.
- → What is the best way to check if the bars are cooked?
Insert a toothpick in the center; it should come out mostly clean with a few moist crumbs when the bars are done.
- → How should these bars be stored?
Store them in an airtight container at room temperature for up to 4 days to maintain freshness.