 Pin It
 My daughter came home from school one March afternoon with a crumpled picture she'd drawn of a bunny, and suddenly Easter felt urgent. We decided right then to make something special for her class party, and these cake pops seemed like the kind of project that would make her eyes light up. There's something magical about turning cake crumbs into little creatures, watching a plain sphere transform into a bunny with personality. That afternoon we discovered it wasn't just about the baking—it was about the decoration, the mess, and her tiny hands pressing on candy ears.
I'll never forget the moment my son bit into one and immediately asked if he could have another—not because they tasted amazing, but because he'd named his bunny and felt like he was doing something slightly mischievous. That's when I realized these weren't just treats; they were edible toys that happened to taste like cake and frosting. Watching people's faces shift from skepticism to delight as they picked one up and saw the bunny details was the real reward.
Ingredients
- Vanilla or funfetti cake mix (1 box, about 400 g): This is your base, and honestly, starting with a box mix takes the pressure off so you can focus on the fun part—making them adorable.
- Eggs, oil, and water (as directed on cake box): Follow what the box tells you; don't try to improvise here or your crumb mixture will be either too dry or too wet to shape.
- Cream cheese (100 g, softened): This gives the frosting tang and helps bind everything together better than butter alone would.
- Unsalted butter (60 g, softened): Room temperature is non-negotiable, or you'll be fighting little chunks when you mix.
- Powdered sugar (120 g): Sift it if you have time; it prevents lumps that ruin the smooth texture you're after.
- Vanilla extract (1/2 tsp): A small amount that makes a difference you'll taste but not identify specifically.
- White chocolate melting wafers or candy melts (400 g): These are easier to work with than real white chocolate, and they set faster—a game changer for cake pops.
- Lollipop sticks (24): These are your bunny handles and they make serving feel special.
- Pink candy melts or colored chocolate: For ears and noses—use what appeals to you aesthetically.
- Edible black food marker or melted dark chocolate: This is how your bunnies get personality; don't skip it.
- Mini marshmallows (optional): Tiny white tails that look deceptively simple but add so much charm.
- Rainbow sprinkles or pastel confetti (optional): These turn a finished bunny into a celebration.
Tired of Takeout? 🥡
Get 10 meals you can make faster than delivery arrives. Seriously.
One email. No spam. Unsubscribe anytime.
Instructions
- Bake and cool your cake:
- Follow the box directions and let it cool completely on a rack—this matters because warm cake turns into mush when you crumble it. Don't rush this step by putting it in the fridge; full cool-down takes about an hour.
- Prepare the frosting:
- Beat cream cheese and butter together until they're pale and fluffy, about 2 minutes, then gradually add powdered sugar and vanilla. You want something smooth enough to spread but thick enough to hold its shape.
- Create the cake crumb mixture:
- Crumble the cooled cake into a bowl with your hands, breaking it into pieces roughly the size of breadcrumbs. Add frosting gradually, mixing by hand or with a fork, until you have something that holds together when you squeeze it but isn't dense and wet.
- Roll and shape your bunnies:
- Divide into 24 roughly equal portions, roll each into a ball, then gently press the top slightly to create an oval bunny head shape. This doesn't have to be perfect; imperfect bunnies are more charming anyway.
- Freeze for stability:
- Place them on parchment paper and freeze for 20 minutes—this step prevents them from falling apart when you dip them in chocolate. Set a timer because even 5 minutes too long won't hurt, but forgetting them entirely might.
- Prepare your chocolate and secure the sticks:
- Melt white chocolate according to package directions, dip each stick's tip into the melted chocolate, then insert it halfway into each cake ball like you're planting a lollipop. This anchoring step means your sticks won't spin or fall out during decorating.
- Dip into white chocolate:
- Working one at a time, dip each cake pop into the melted white chocolate, let excess drip off for a few seconds, then stand it upright in a styrofoam block. The coating should be smooth and uniform, about the thickness of a coin.
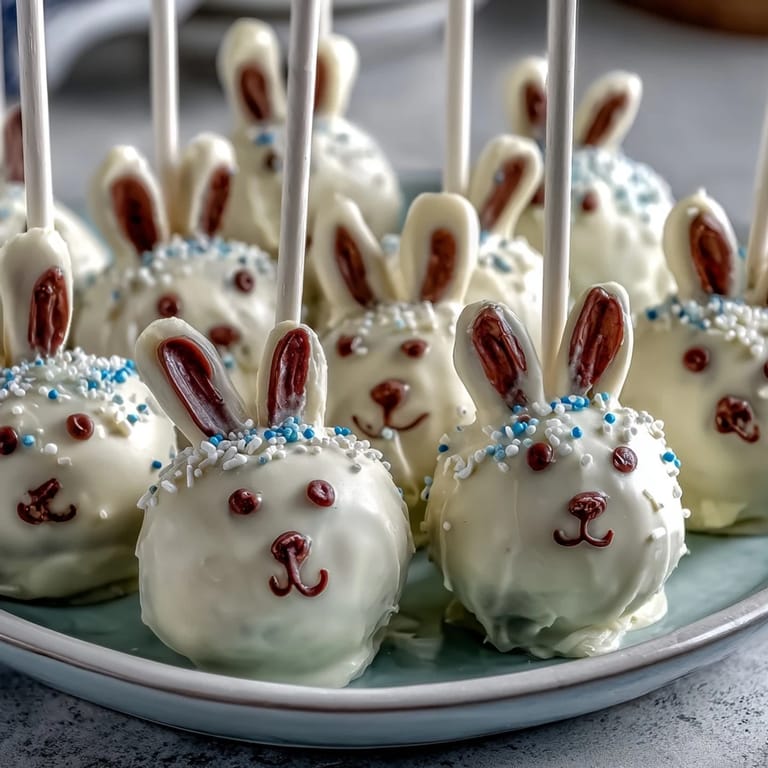
- Add ears and tails while coating is wet:
- Pink pieces stick best while the white chocolate is still tacky, so don't wait. Press ears onto the top sides of each bunny head and a tiny marshmallow tail onto the back, letting the chocolate set around them.
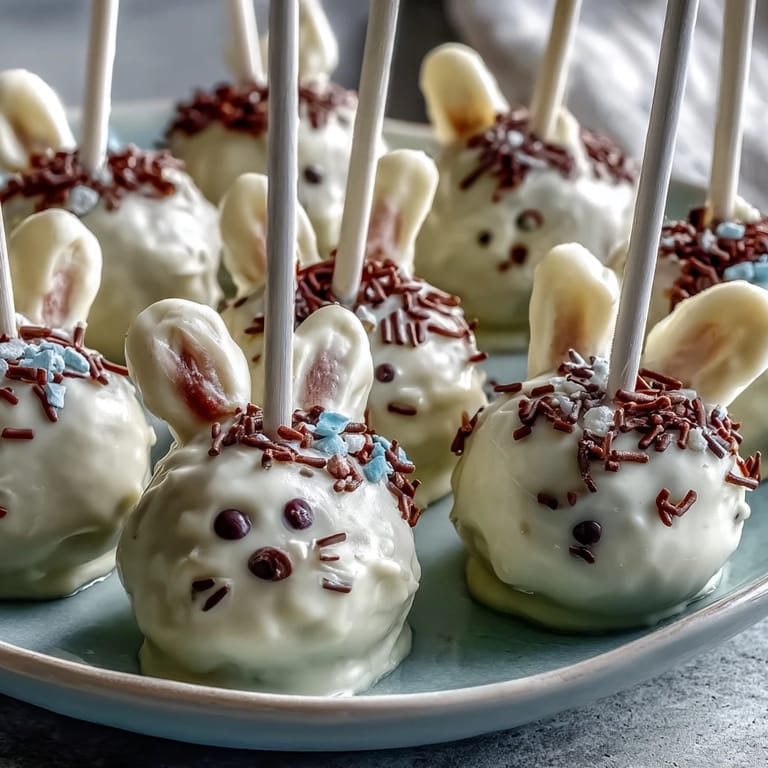
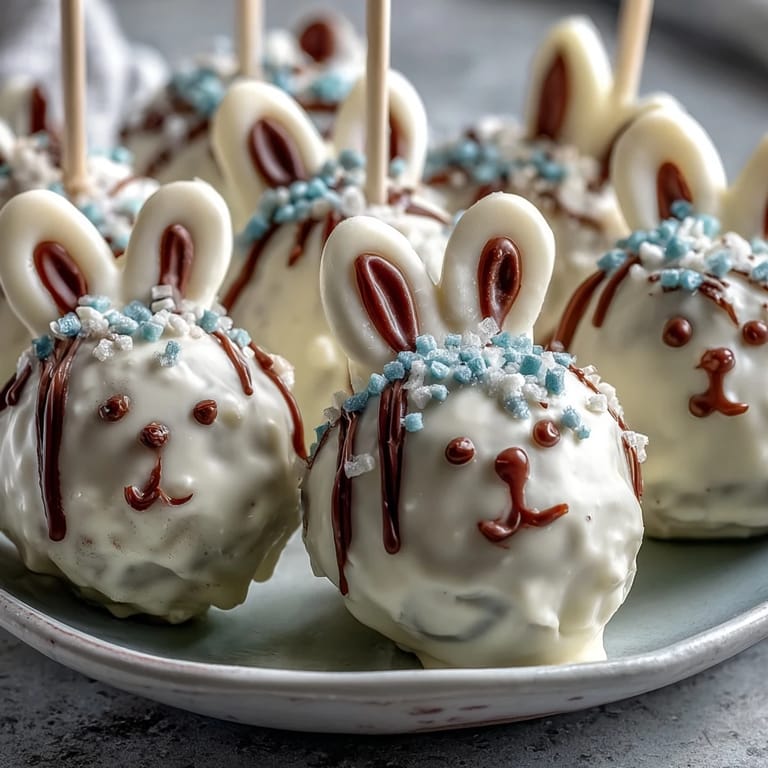
- Draw on the bunny face:
- Once everything is set, use your edible marker or melted dark chocolate to draw eyes, whiskers, and a pink nose. This is where they stop being plain cake pops and become actual bunnies with personality.
- Final touches and set time:
- Add sprinkles or confetti if you like, then let everything cure completely before moving them around—about 30 minutes is usually enough, but overnight is ideal if you're not in a rush.
 Pin It
 There was one Easter morning when I made a double batch and my neighbor peeked over the fence to find our kitchen looking like a candy explosion—white chocolate on the counters, sprinkles everywhere, my hands covered in pink residue. She asked if she could buy a dozen, and that's when I realized these little things had become more than a recipe. They were something people wanted to celebrate with, to give away, to make memories around.
Decorating Like You Mean It
The decoration phase is where these shift from just-another-dessert to conversation starters. I learned quickly that attention to detail here pays off—crooked ears are endearing, but symmetrical ears that are actually stuck on properly look intentional and deliberate. The eyes and whiskers are your bunny's entire personality, so take a breath, steady your hand, and remember that even wobbly whiskers tell a story.
Storage and Make-Ahead Strategy
You can make the cake and frosting up to 2 days ahead, which means on party day you're really just doing the fun stuff—rolling, dipping, and decorating. Once they're fully assembled and set, they keep in an airtight container in the fridge for up to 4 days, though I've found they taste freshest within 48 hours. If you're making them for an event, assembling them the morning of is ideal; they look pristine and the white chocolate coating has that perfect snap.
Variations and Customizations
While Easter bunnies are the obvious choice, this same technique works for anything seasonal—make them into chicks with yellow coating and orange noses, or turkeys with feather decorations come fall. The beauty is that once you understand the crumb-frosting ratio and the dipping technique, you can dress them as almost anything and people will be delighted. I've also experimented with different cake flavors, from chocolate to lemon, and they all work beautifully.
- Gluten-free versions are completely doable—just use a gluten-free cake mix and ensure your candy melts and decorations are certified gluten-free.
- If you're intimidated by the edible marker, melted dark chocolate piped through a squeeze bottle gives you more control and looks intentional.
- Don't throw away leftover frosting; it's excellent on graham crackers or as a dip for fresh fruit.
 Pin It
 These little bunnies have a way of turning ordinary afternoons into moments people remember. Whether you're making them for a party, a gift, or just because spring arrived and you felt like creating something small and joyful, they deliver.
Recipe Questions & Answers
- → What cake base works best for these bunny treats?
Vanilla or funfetti cake mixes provide a moist and flavorful base that complements the white chocolate coating and decorations well.
- → How do I ensure the coating sets smoothly?
Use melted white chocolate wafers and dip each shaped piece carefully, tapping off excess before standing them upright to dry fully.
- → Can I prepare these in advance?
Yes, store the finished treats in an airtight container in the refrigerator for up to four days to maintain freshness and shape.
- → What are good alternatives for bunny ears decoration?
Pink candy melts or colored chocolate shaped into ears harden well and provide vibrant, edible accents for the bunny shapes.
- → How do I add facial features to the treats?
Use an edible black food marker or melted dark chocolate to draw eyes and whiskers, while pink candy or chocolate serve as noses.